Tuesday, 10 November 2015

Error while setting server report parameters. Error message: The permissions granted to user 'Domain\User' are insufficient for performing this operation. (rsAccessDenied)


Solution : This is nothing but the Permission issue which we have to assign to the user.

Open the Report Manager website for the Reporting Services instance. By default, the URL is http://[SSRSServerName]:80/Reports

For SSRS server name go to : System administration > Setup > business intelligence > Reporting services > Report Server > 

in reporting server information Tab you will get the server name

Step 1 : Click on Dynamics ax folder 

Step 2 : Click on Folder Settings.

Step 3 :  Click on Security.

Step 4 :  Click on New Role Assignment.

Step 5 : Enter the Active Directory user name or group to assign to the DynamicsAXBrowser role.

Step 6  : Select the DynamicsAXBrowser role.

Step  7 : Click OK

I hope Now you can access ssrs reports. 

Sunday, 8 November 2015

SSRS – Create child group in same column below parent

A few months ago I was developing a report and wanted a child group in the same column below its parent.  I did tried quite a few combinations of inserting and deleting of groups, rows and columns until I finally found the right way to do it.
This week I wanted a similar report and decided to write down the steps to accomplish that, otherwise simple task.  The example was made in SQL Server Reporting Services 2008 R2.
We start by creating the parent group:
Then we create the child group:
In the parent insert row inside the group above:
This is how it will look like after creating the row inside above group:
Drag and drop to move the parent group field above the child field in the next column:
Delete the, now empty, column where the parent field previously was:
You’re done!  The child group is now below its parent:


Import Main Accounts using Data Import framework | AX 2012 R3


Make sure that Data Import Export Framework install in you system. then after follow the following steps.

1- Go to General ledger --> Setup --> Charts of Accounts--> Chart of accounts.

2- Create New Chart of Accounts (chart of account, Description) then close the form.

3- Go to General ledger --> Setup --> Ledger.

4- Assign the new chart of account to the ledger(from step 2),select the fiscal calendar and the Accounting Currency then close the form.

4- Go to Data import export framework --> Setup --> Data import / export framework Parameters.

5- Click browse to select shared working directory then click Validate button then close the form.

6- Go to Data import export framework --> Setup --> Source Data format, Create new source name and make sure to chose File in the Type then Change the Column delimiter if needed.

7- Go to Data import export framework --> Common --> Processing Group, Create New Group then Click the Entities Button.

8- in the entities form select the main Account Entity, CSV in the Sources data format, then Click the generate source file button.

9- in the wizard make sure to select the following fields:
Chartofaccounts (Chart of account code: from step 2)
MainAccountId (Account Code)
Name (Account Description)
Type (Account Type  ) 
then click Generate sample file.

10-Save the file in the shared folder you specified in step 5.

11-Open the file using MS Excel, fill the data then save the file.

12-Go back to the processing group --> entities---> Select the Sameple file path then click the generate source mapping button.


13- if the mapping done successfully Click the Preview source file button to preview the data then close the form.

14- in the processing group select the group name then click the Get staging data button to copy the file data to staging table.

15-Click OK to create job.

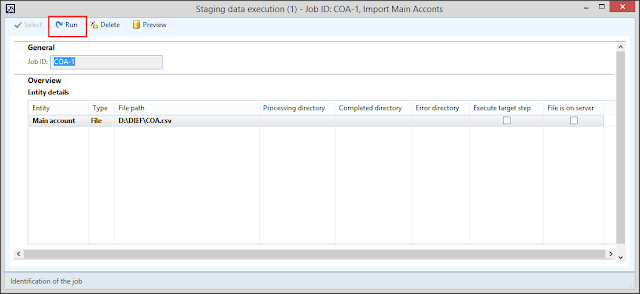
16-Click Run in the staging data execution form.

17-Click OK.

18-The records will be inserted in the staging.

19-In the processing group select the group name then click Copy Data to target button.

20-Select the Job ID that we created in step 15 then click OK.

21- Click Run to import data.

22-Click OK.

23-The data will be written to target.

24-Go to the main account form you will found that the accounts was imported successfully.

Note  :  If you face any issue during th process just chck the error log.


Access denied for user in Data Migration framework - Ax 2012 R3


if you get this error at time of parameter validation for DIXF.


   " Access Is denied For the user"

Solution :

-> Add the Data Import/Export Framework service account to the Microsoft Dynamics AX Data Import Export Framework Service Users local group on the computer that is running the Data Import/Export Framework service. Then restart that computer.

Hope it will work :)

Friday, 6 November 2015

Import data for ax 2012 R3 CU8 by using Test Data Transfer Tool

The contoso demo data for Dynamics Ax 2012 R3 is different from previous version.we used .dat file to load demo data in previous versions. Demo data is available in .exe file.
i.e DynamicsAX2012R3DemoData.exe available in partner Resource.

 https://mbs.microsoft.com/partnersource/northamerica/deployment/downloads/product-releases/MSDYAX2012R3Release#DownloadProductandRelatedTools


To import this demo data we need  Test Data transfer Tool is available on partner resource.
Go on following link

https://informationsource.dynamics.com//RFPServicesOnline/Rfpservicesonline.aspx?ToolDocName=Microsoft+Dynamics+AX+2012+Test+Data+Transfer+Tool+(Beta)%7cQJ4JEM76642V-8-1465

OR

Download the demo data and Test Data Transfer Tool (beta)

  1. Download the AX 2012 R3 demo data from the Release Page on PartnerSource.
  2. Extract the demo data from the package to the database server that hosts the AX 2012 R3 business database for your environment.
  3. Download the Test Data Transfer Tool (beta) tool installer from the Downloadable tools section of Microsoft Dynamics Lifecycle Services, and install it on the database server that hosts the AX 2012 R3 business database for your environment.
  4. Verify that you have appropriate permissions to import data. You must have read access to the location where the demo data is stored, and in SQL Server Management Studio, permission to execute SELECT statements and BULK INSERT statements. For more information, see Install the Test Data Transfer Tool (beta) for Microsoft Dynamics AX.

To import demo data we need to do the following steps.

Step 1:
  • Extract the demo data files from DynamicsAX2012R3DemoData.exe to a specific location.
Step1
  • The output folder will contain the files of following extension types:
  1. .OUT—– data file that contains metadata for AX transactional database
  2. .OutModel —- data file that contain metadata for AX model database
  3. .XML —- data file that contains AX table data.
Step 2:
 Run the Test Data Transfer Tool.Exe file to install the utility.
zb2
  • After successful installation, the folder will look like as shown below:
zb3
Step 3 :
  • Open AX client and import the .XPO named (MetaDataXMLGenerator.Xpo)
zb4
  • On successful import a job will be created as shown below:
zb5
Step 4:
  • Run the job <MetadataXMLGenerator(usr)>, a  meta data file will be generated and the path will be displayed in the infolog as shown in the snapshot below:

Step 5:
Copy the metadata file from the above path and paste it in [lists] folder (where Test Data Transfer Tool has been extracted). If the file already exists, then overwrite the file.

Step 6 :
Stop MS Dynamics AX service.

Step 7 :
Open command prompt using administrator and navigate to the path where the Test Data Transfer Tool is extracted).

Step 8:
  • Run the following command:
Dp.exe Import “C:\R3DemoData\DynamicsAXR3DemoData” DynamicsAXR3
C:\R3DemoData\DynamicsAXR3DemoData—— update the path (Demo Data extraced path)
DynamicsAXR3—— provide the actual database name.(Ax DB Name)
Step 9 : you need to install Test data transfer tool on SQL server and run DP command on same server. 
in case of standalone you will get the following screen.

If we enter ‘Y’, then following screen will open up describing the count for importing the table data and Error (if they come up)
zb8
  • The process may take hours depending upon machine configuration.
  • On successful import, start ax services again , Open AX client and data will show up.